12.1 Defining User Identification for Liberty and SAML 2.0
12.1.1 Selecting a User Identification Method for Liberty or SAML 2.0
User identification determines how an account at the identity provider is matched with an account at the service provider. If federation is enabled between the two, the user can set up a permanent relationship between the two accounts. If federation is not enabled (see Section 7.8, Configuring an Authentication Request for an Identity Provider), you cannot set up a user identification method.
-
In the Administration Console, click > > > > > .
-
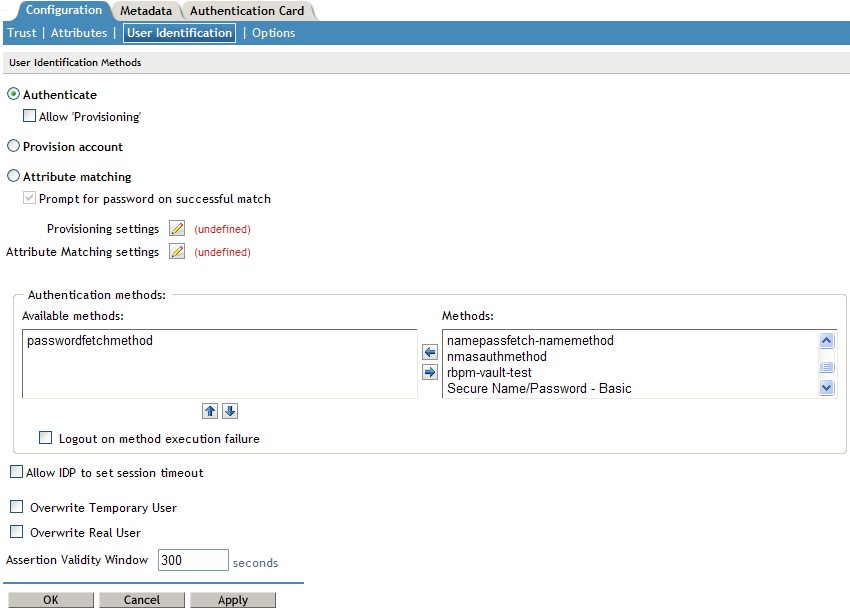
Specify how users are identified on the SAML 2.0 or Liberty provider. Select one of the following methods:
-
Authenticate: Select this option when you want to use login credentials. This option prompts the user to log in at both the identity provider and the service provider on first access. If the user selects to federate, the user is prompted, on subsequent logins, to authenticate only to the identity provider.
-
Allow ‘Provisioning’: Select this option to allow users to create an account when they have no account on the service provider.
This option requires that you specify a user provisioning method.
-
-
Provision Account: Select this option when the users on the identity provider do not have accounts on the service provider. This option allows the service provider to trust any user that has authenticated to the trusted identity provider
This option requires that you specify a user provisioning method.
-
Attribute matching: Select this option when you want to use attributes to match an identity server account with a service provider account. This option requires that you specify a user matching method.
-
Prompt for password on successful match: Select this option to prompt the user for a password when the user’s name is matched to an account, to ensure that the account matches.
-
-
-
Select one of the following:
-
If you selected the option, select a method, then click . If you have not created a matching method, continue with Section 12.1.2, Configuring the Attribute Matching Method for Liberty or SAML 2.0.
-
If you selected the option, select a method, then click . If you have not created a provisioning method, continue with Section 12.6, Defining the User Provisioning Method.
-
If you selected the option with the option, select a method, then click . If you have not created a provisioning method, continue with Section 12.6, Defining the User Provisioning Method.
-
If you selected the option without the option, click .
-
-
Configure the authentication method.
Available Methods: Using the arrow keys to move methods from the list to the list. The selected method is executed when post remote authentication completes.
For example if you select the passwordfetch method, this method is executed at the service provider after the identity provider authentication and federation completes.
Logout on method execution failure: If you enable this check box, then whenever there is a session failure, the user is logged out automatically.
-
Configure the session options.
Allow IDP to set session timeout: Select Allow Identity Provider to set session timeout between the principal identified by the subject and the SAML authority based on attribute in SAML assertion of .
Overwrite Temporary User: If you select this check box, then the temporary user credentials profile got form previous authentication method in the same session will be overwritten with real user credentials profile got from this authentication method.
Overwrite Real User: If you select this check box, then the real user credentials profile got form previous authentication method in the same session will be overwritten with real user credentials profile got from this authentication method
Assertion Validity Window: You can manually set the assertion validity time for SAML Service Provider (SP) to accommodate clock skew between Service Provider and SAML Identity (IDP) Server.
-
Click twice, then update the Identity Server.
12.1.2 Configuring the Attribute Matching Method for Liberty or SAML 2.0
If you enabled the option when selecting a user identification method, you must configure a matching method.
The Liberty Personal Profile is enabled by default. If you have disabled it, you need to enable it. See Section 14.2, Managing Web Services and Profiles.
-
In the Administration Console, click > > > > > > .
-
Click .
-
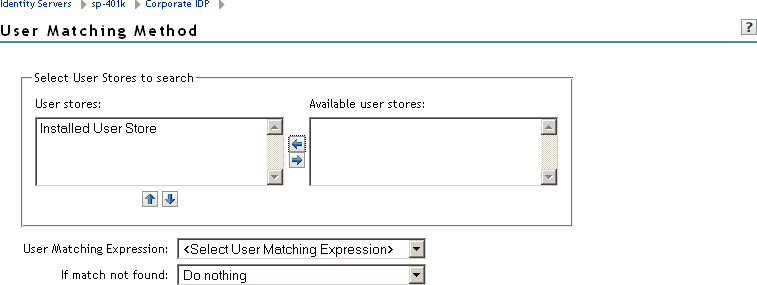
Select and arrange the user stores you want to use.
Order is important. The user store at the top of the list is searched first. If a match is found, the other user stores are not searched.
-
Select a matching expression, or click to create a look-up expression. For information on creating a look-up expression, see Section 6.3, Configuring User Matching Expressions.
-
Specify what action to take if no match is found.
-
Do nothing: Specifies that an identity provider account is not matched with a service provider account. This option allows the user to authenticate the session without identifying a user account on the service provider.
IMPORTANT:Do not select this option if the expected name format identifier is persistent. A persistent name format identifier requires that the user be identified so that information can be stored with that user. To support the option and allow anonymous access, the authentication response must be configured for a transient identifier format. To view the service provider configuration, see Section 7.9, Configuring an Authentication Response for a Service Provider.
-
Prompt user for authentication: Allows the user to specify the credentials for a user that exists on the service provider. Sometimes users have accounts at both the identity provider and the service provider, but the accounts were created independently, use different names (for example, joe.smith and jsmith) and different passwords, and share no common attributes except for the credentials known by the user.
-
Provision account: Assumes that the user does not have an account at the service provider and creates one for the user. You must create a provisioning method.
-
-
Click .
-
(Conditional) If you selected when no match is found, select the icon. For information on this process, see Section 12.6, Defining the User Provisioning Method.
-
Click twice, then update the Identity Server.