10.1 Entering Outages in the Console
Manual outages can be created on any specific element by right-clicking the element, then selecting .
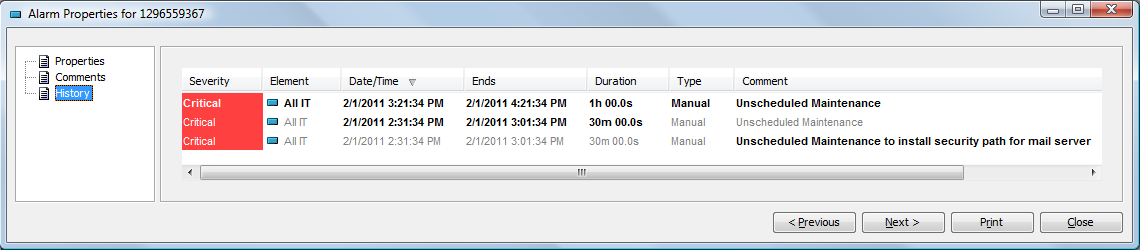
After an outage is manually created, it can be edited and cleared at any time through options available directly on the outage in the view while viewing > . Manual outages entries are bolded by default for easy identification and have an value of Manual. As a manual outage is updated and edited, the history is retained and can be viewed in alarm properties.
Manual outages are stored in the Service Warehouse. If you suspect a manual outage is not applied immediately to agreement real-time calculations, you might need to perform a manual calculation on agreements.
NOTE:Real-time breaches are not created for manual outages as they would for real-time outages. However breaches are simulated and included for manual outages in SLA reports. For more information, see Section 10.3, Understanding Manual Outages in Breach Reporting.
Only the most current entry of a manual outage is included in Service Level Agreement calculations. Cleared outages are excluded from all Service Level Agreement calculations.
10.1.1 Specifying a Manual Outage for an Element
To specify a manual outage:
-
In the pane, right-click an element, then select .
-
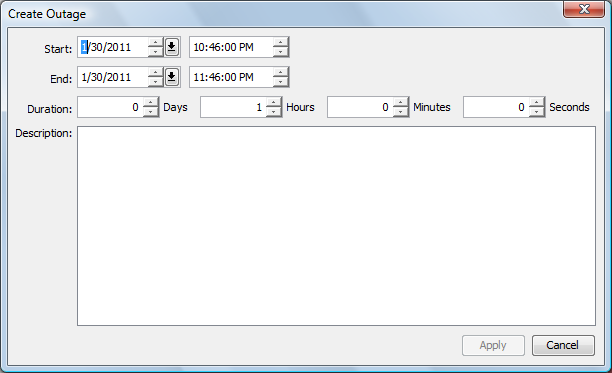
Specify the Start date and time of the outage.
-
Specify the End date and time of the outage.
or
Specify the Duration of the outage in days, hours, minutes, and/or seconds.
If the Duration is specified, the End date and time is automatically updated.
-
Specify a description in the field.
This descriptive text displays as part of the outage alarm in the column.
-
Click to save and apply the manual outage to the associated element.
10.1.2 Editing a Manual Outage
To edit a manual outage:
-
In the pane, navigate to and click an element.
-
In the view pane, click the tab to open the view.
-
On the toolbar, click , then click > .
-
Adjust the timeline selector to show the time range that includes the manual outage.
-
Click .
-
Right-click the manual outage, then select .
-
Update the outage as required.
-
Click to save the outage settings.
10.1.3 Clearing a Manual Outage
To clear a manual outage:
-
In the view, right-click the outage, then select .
A confirmation message asks for you to confirm the deletion.
-
Click to confirm the deletion.
The outage receives a deletion entry and displays in the view as a strikethrough entry.
10.1.4 Viewing Manual Outages
To view manual outages:
-
In the pane, navigate to and click an element.
-
In the view pane, click the tab to open the view.
-
On the toolbar, click , then click > .
-
Use the timeline selector to select the time range, then click .
All generated and manual outages for the selected time range display in the view. Manual outages display as bolded entries.
10.1.5 Viewing the History of a Manual Outage
To view manual outage history:
-
In the view, right-click the outage, then select :
-
In the left pane, click .
Each change in the outage is listed as a line item. Changed or updated items are bolded, as shown in the and columns in the illustration in Step 1.