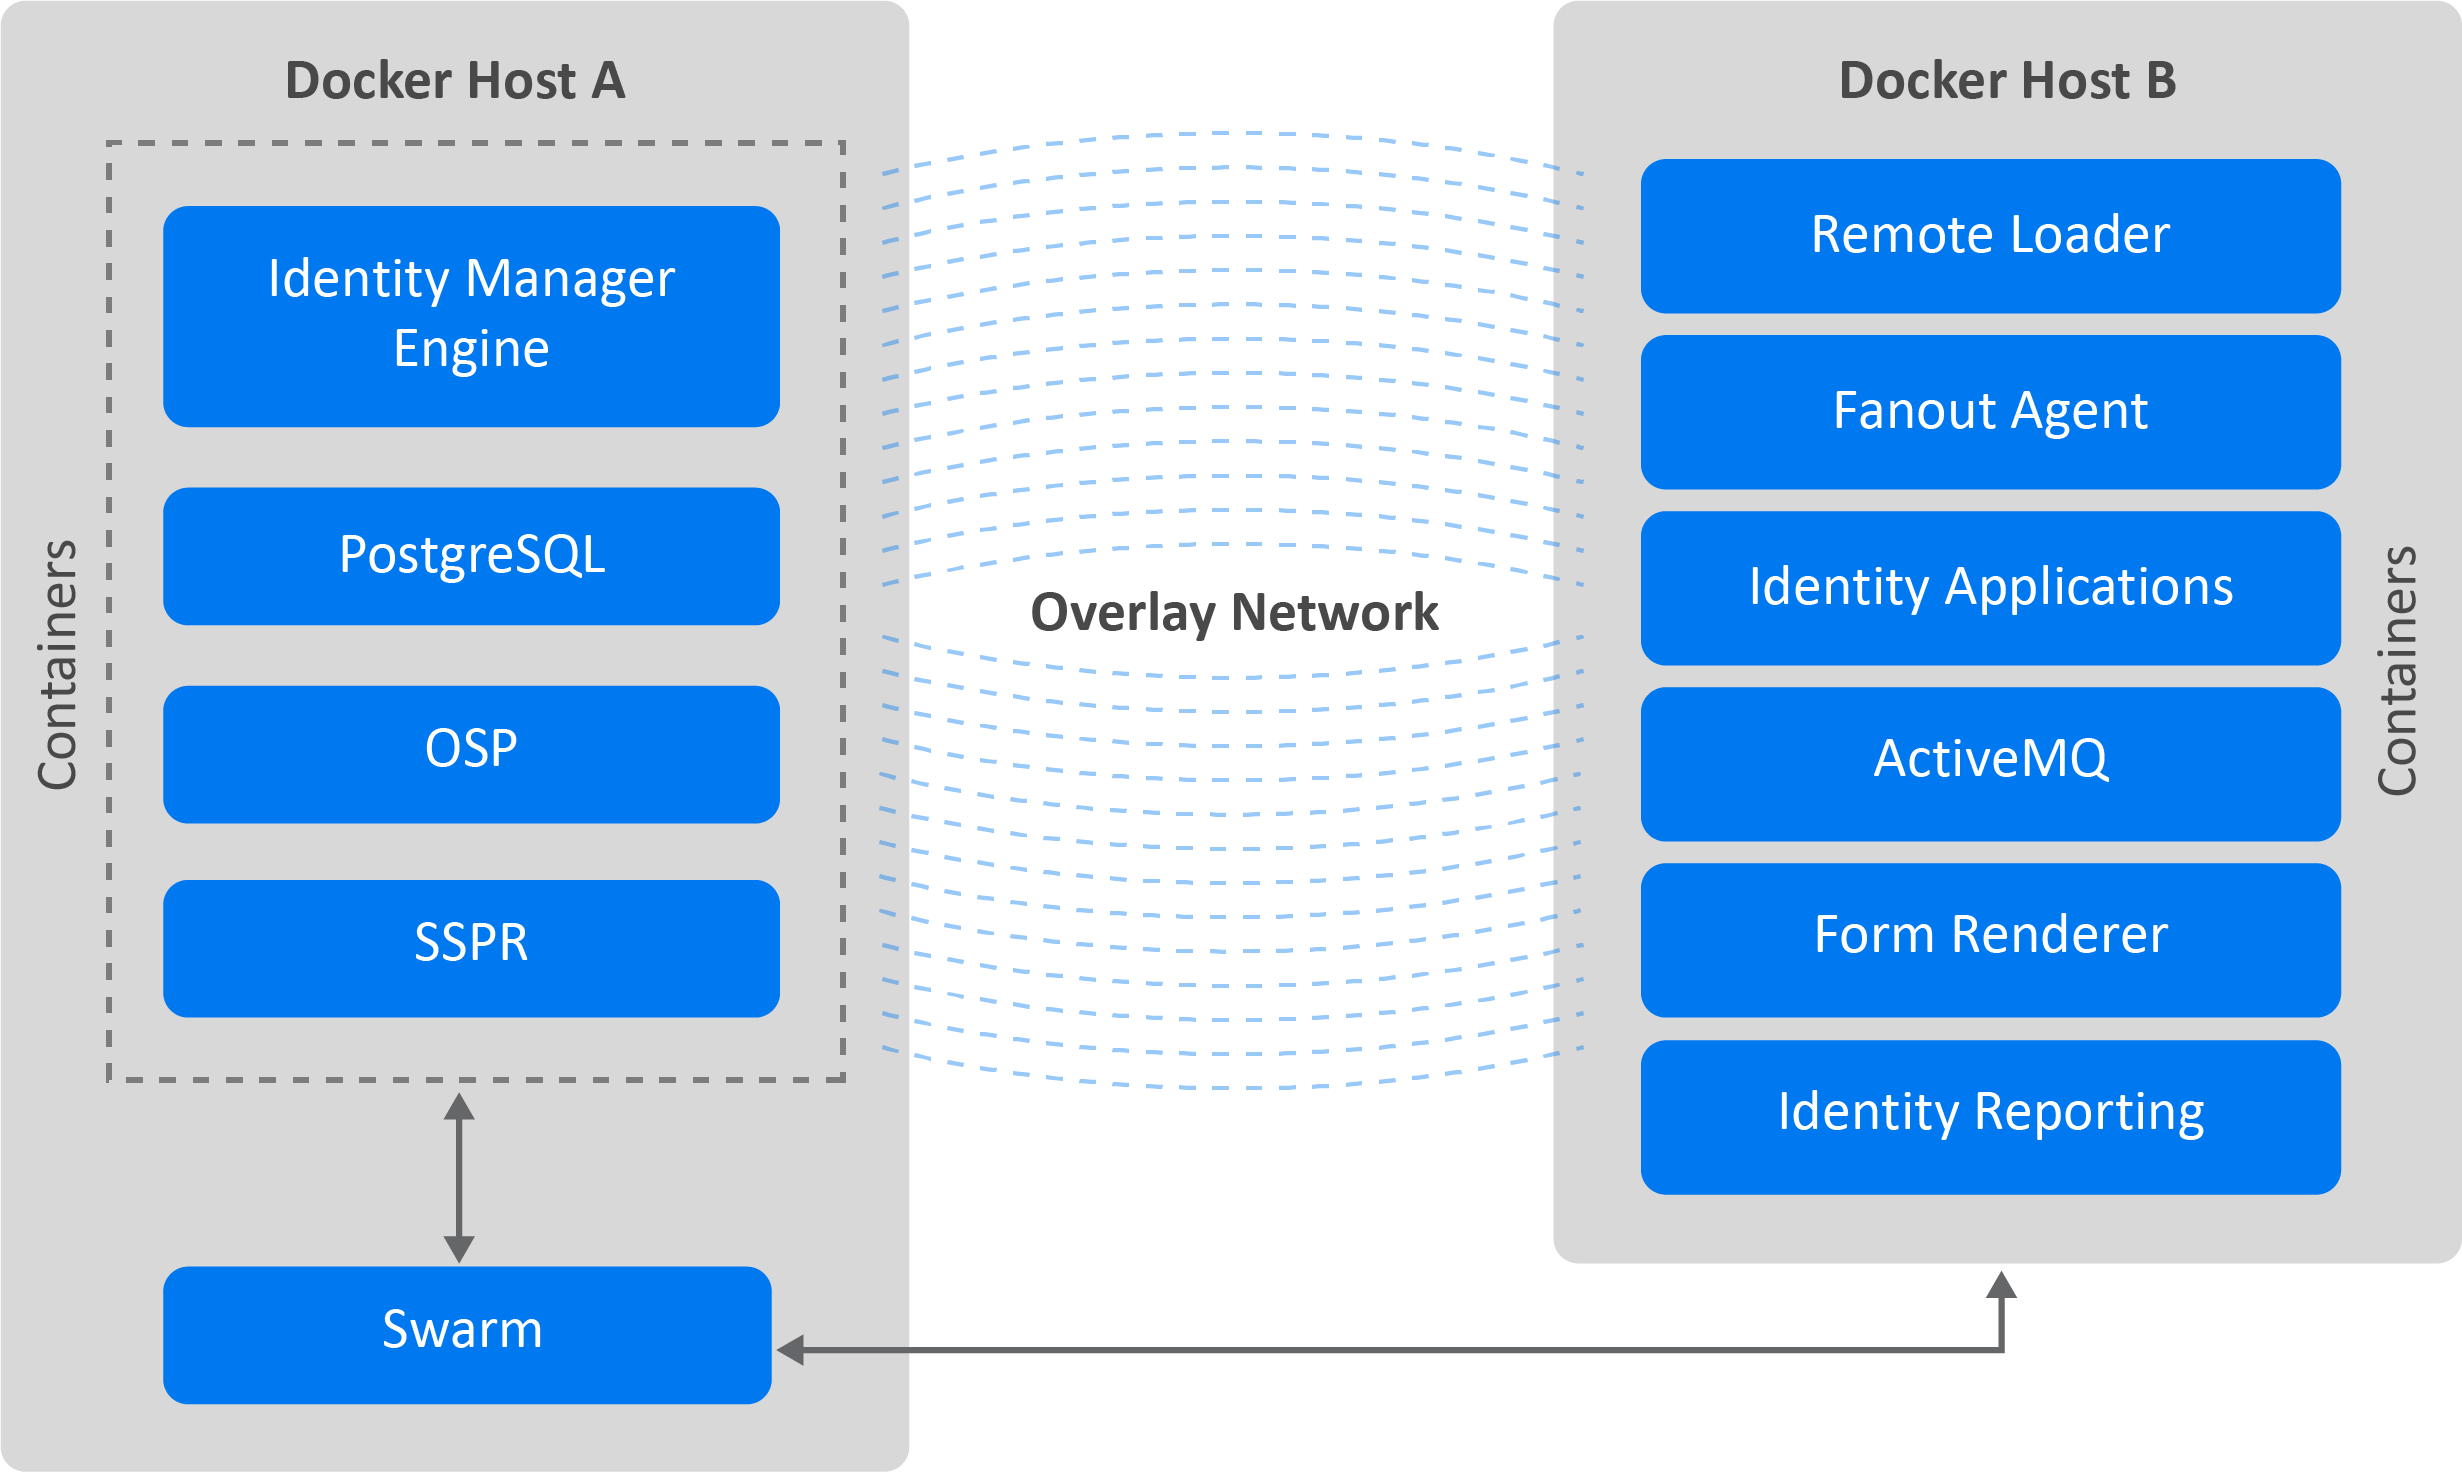
NetIQ recommends you to use overlay or bridge network mode for deploying all Identity Manager containers in a distributed setup. The scenarios documented in the guide is specific to container deployment in an overlay network. However, you can also use bridge network for deploying containers.In the following distributed servers scenario, the Identity Manager Engine, PostgreSQL, OSP, and SSPR containers will be deployed on Docker Host A. On Docker Host B, the Remote Loader, Fanout Agent, Identity Applications, ActiveMQ, Form Renderer, and Identity Reporting containers will be deployed.
The following figure illustrates the deployment of Identity Manager containers on two Docker hosts in a overlay network.
NOTE:Since cluster store is no longer supported, Docker swarm can be used to set up overlay networks. To know more about the deprecation, check cluster store.
Figure 18-1 Containers Deployment Architecture in an Overlay Network
Perform the following steps to set up an overlay network:
Run the following command on Docker Host A:
docker swarm init
Note down the join command generated from the output of step 1 then run this join command on Docker host B to create the swarm network between these two hosts.
For example:
docker swarm join --token SWMTKN-1-24vozonapa4anwszd3ykthgomo84e9y3p3vbcrtibz6jzo94k2-148g7yrnepmz963x3z5udnae4 10.71.142.191:2377
NOTE:In case you missed the command to join worker node run this command to get the join command:
docker swarm join-token worker
Run the following command to check the status of all the hosts:
docker node ls
Create an overlay network on Docker Host B using the following command:
docker network create --driver overlay --subnet=<subnet-cidr> --gateway=<gateway-ip> --attachable <network-name>
For example:
docker network create --driver overlay --subnet=192.168.0.0/24 --gateway=192.168.0.1 --attachable idmoverlaynetwork
Run the following command to verify whether the overlay network is created:
docker network ls
NOTE:As swarm dynamically assigns IP, during container deployment make sure that the swarm load balancer uses a new IP address that hasn’t been occupied by any of the Identity Manager components or else you may face the following error:
Error response from daemon: attaching to network failed, make sure your network options are correct and check manager logs: context deadline exceeded
Run the following command to check the IP of the swarm load balancer:
docker inspect idmoverlaynetwork | grep lb-idmoverlaynetwork -A 7
The /etc/hosts file of all the Docker hosts in your Docker deployment must be updated with the details of all the containers running on that host. Ensure that the hostname for all containers are in Fully Qualified Domain Name (FQDN) format only.
The host file entries can follow the below format for all the components:
<IP of the container> <FQDN> <short_name>
In the sample deployment used in this guide, add the following entries in the /etc/hosts file:
192.168.0.12 identityengine.example.com identityengine 192.168.0.2 remoteloader.example.com remoteloader 192.168.0.3 fanoutagent.example.com fanoutagent 192.168.0.5 osp.example.com osp 192.168.0.6 postgresql.example.com postgresql 192.168.0.7 identityapps.example.com identityapps 192.168.0.8 formrenderer.example.com formrenderer 192.168.0.9 activemq.example.com activemq 192.168.0.10 identityreporting.example.com identityreporting 192.168.0.11 sspr.example.com sspr
Ensure that the third party jar files are volume mounted so that they are available when the container is started every time. For example, if the ojdbc.jar is present in the /opt/netiq/idm/apps/tomcat/lib directory of the container, then you must volume mount the jar file using a sample command such as:
-v /host/ojdbc.jar:/opt/netiq/idm/apps/tomcat/lib/ojdbc.jar
You must generate the silent properties file before you deploy the containers. For more information on generating the silent properties file, see the Creating the Silent Properties File.
As a prerequisite, you must know the ports that you want to use for a container. You must expose the required ports and map the container ports with the ports on the Docker host. The following table provides information on ports that you must expose on the Docker hosts based on the examples provided in the guide.
Table 18-2 Default Ports Exposed As per the Sample Deployment
|
Container |
Default ports assumed as per the example deployment |
|---|---|
|
Remote Loader |
8090 |
|
Fanout Agent |
Not applicable |
|
OSP |
8543 |
|
Identity Applications |
18543 |
|
Identity Reporting |
28543 |
|
Form Renderer |
8600 |
|
ActiveMQ |
|
|
PostgreSQL |
5432 |
|
SSPR |
8443 NOTE:SSPR container runs only on 8443 port. |
However, you can customize the ports based on your requirement. The following considerations apply while you expose the ports:
Ensure that you expose those ports which are not in use.
The container port must be mapped to the same port on the Docker host. For example, the 8543 port on the container must be mapped to the 8543 port on the Docker host.
The containers must be deployed in the following order:
Generate the silent properties file. For more information, see Creating the Silent Properties File.
From the location where you have extracted the Identity_Manager_4.9.0_Containers.tar.gz file, navigate to the Identity_Manager_4.9.0_Containers/docker-images directory.
Run the following command to load the image:
docker load --input IDM_490_identityengine.tar.gz
Deploy the container using the following command:
docker run --restart unless-stopped -d --ip=192.168.0.12 --network=idmoverlaynetwork --hostname=identityengine.example.com --name=engine-container -v /etc/hosts:/etc/hosts -v /data:/config -p 8028:8028 -p 524:524 -p 389:389 -p 8030:8030 -p 636:636 -e SILENT_INSTALL_FILE=/config/silent.properties --stop-timeout 100 identityengine:idm-4.9.0-580
To verify whether the container was successfully deployed, check the log files by running the following command:
tail -f /data/idm/log/idmconfigure.log
To log in to the container, run the following command:
docker exec -it <container> <command>
For example,
docker exec -it engine-container bash
NOTE:To run the Identity Vault utilities such as ndstrace or ndsrepair, log in to the container as a non-root user called as nds. These utilities cannot be run if you are logged in as a root user. To log in to the container as a nds user, run the docker exec -it engine-container sudo nds command.
From the location where you have extracted the Identity_Manager_4.9.0_Containers.tar.gz file, navigate to the Identity_Manager_4.9.0_Containers/docker-images directory.
Run the following command to load the image:
docker load --input IDM_490_remoteloader.tar.gz
Deploy the container using the following command:
docker run -d --ip=192.168.0.2 --network=idmoverlaynetwork --hostname=remoteloader.example.com -p 8090:8090 --name=rl-container -v /etc/hosts:/etc/hosts -v /data:/config remoteloader:idm-4.9.0-580
This deploys the 64-bit and 32-bit version of the Remote Loader. The driver files can be found at the /opt/novell/eDirectory/lib/dirxml/classes/ directory of the container.
(Conditional) If you do not want to use configuration files while deploying the container, deploy the container using the following command:
docker run --restart unless-stopped -d --ip=192.168.0.2 --network=idmoverlaynetwork --hostname=remoteloader.example.com -p 8090:8090 --name=rl-container -v /etc/hosts:/etc/hosts -v /data:/config --stop-timeout 100 remoteloader:idm-4.9.0-580
To log in to the container, run the following command:
docker exec -it <container> <command>
For example,
docker exec -it rl-container bash
Configure Remote Loader. For more information, see Configuring the Remote Loader and Drivers in the NetIQ Identity Manager Driver Administration Guide.
From the location where you have extracted the Identity_Manager_4.9.0_Containers.tar.gz file, navigate to the Identity_Manager_4.9.0_Containers/docker-images directory.
Run the following command to load the image:
docker load --input IDM_490_fanoutagent.tar.gz
Deploy the container using the following command:
docker run --restart unless-stopped -d --ip=192.168.0.3 --network=idmoverlaynetwork --hostname=fanoutagent.example.com --name=foa-container -v /etc/hosts:/etc/hosts -v /data:/config --stop-timeout 100 fanoutagent:idm-4.9.0-580
To log in to the container, run the following command:
docker exec -it <container> <command>
For example,
docker exec -it foa-container bash
Configure the Fanout Agent. For more information, see Configuring the Fanout Agent in the NetIQ Identity Manager Driver for JDBC Fanout Implementation Guide.
(Conditional) This section applies only if you are using Identity Vault as the Certificate Authority.
The following components require you to generate certificates before they are deployed. Before you generate the certificates for the following components, ensure that you deploy the Identity Manager Engine container.
Perform the following steps to generate the certificates:
Ensure that the Java version installed is Azul Zulu 1.8.0_392 or later.
Ensure that you set the Java path in the docker host. For example, run the following command:
export PATH=<java installed location>/bin:$PATH
For example,
export PATH=/opt/netiq/common/jre/bin/:$PATH
Generate the PKCS keystore:
keytool -genkey -alias osp -keyalg RSA -storetype pkcs12 -keystore /data/tomcat-osp.ks -validity 3650 -keysize 2048 -dname "CN=osp.example.com" -keypass <password> -storepass <password>
Generate a certificate signing request:
keytool -certreq -v -alias osp -file /data/osp.csr -keypass <password> -keystore /data/tomcat-osp.ks -storepass <password>
Generate a self-signed certificate:
Launch Identity console and login.
Navigate to Certificate Management > Issue Certificate.
Browse to the .csr file created in step 4. For example, osp.csr.
Click Open.
Under Key Usage Specifications drop-down, Specify the key type.
Under Extended Key Usage Specifications drop-down, Specify the Extended key type.
For the certificate type, select Unspecified under Basic Constrains drop down.
Specify the validity of the certificate under Certificate Parameters drop down.
Select the File in binary DER format under Certificate format drop down.
Click Next.
Click OK.
Download the certificate and copy the downloaded certificate to the /data directory.
Export the root certificate in .der format:
Launch Identity console and login.
Navigate to Certificate Management > Server Certificate Management.
Select the SSL CertificateDNS check box and click Export.
In the Certificates drop-down list, select the Organizational CA.
In the Export Format drop-down list, select DER.
Click OK.
Download the certificate and copy the downloaded certificate to the /data directory.
Import the certificates into the PKCS keystore you created in step 2:
keytool -import -trustcacerts -alias root -keystore /data/tomcat-osp.ks -file /data/cert.der -storepass <password> -noprompt
keytool -import -alias osp -keystore /data/tomcat-osp.ks -file /data/osp.der -storepass <password> -noprompt
NOTE:Ensure that the keystore is available in the path that was specified as an input for deployment.
Perform the following steps to generate the certificates:
Ensure that the Java version installed is Azul Zulu 1.8.0_392 or later.
Ensure that you set the Java path. For example, run the following command:
export PATH=<java installed location>/bin:$PATH
For example,
export PATH=/opt/netiq/common/jre/bin/:$PATH
Generate the PKCS keystore:
keytool -genkey -alias ua -keyalg RSA -storetype pkcs12 -keystore /config/tomcat-ua.ks -validity 3650 -keysize 2048 -dname "CN=identityapps.example.com" -keypass <password> -storepass <password>
Generate a certificate signing request:
keytool -certreq -v -alias ua -file /data/ua.csr -keypass <password> -keystore /data/tomcat-ua.ks -storepass <password>
Generate a self-signed certificate:
Launch Identity console and login.
Navigate to Certificate Management > Issue Certificate.
Browse to the .csr file created in step 4. For example, ua.csr.
Click Open.
Under Key Usage Specifications drop-down, Specify the key type.
Under Extended Key Usage Specifications drop-down, Specify the Extended key type.
For the certificate type, select Unspecified under Basic Constrains drop down.
Specify the validity of the certificate under Certificate Parameters drop down.
Select the File in binary DER format under Certificate format drop down.
Click Next.
Click OK.
Download the certificate and copy the downloaded certificate to the /data directory.
Export the root certificate in .der format:
Launch Identity console and login.
Navigate to Certificate Management > Server Certificate Management.
Select the SSL CertificateDNS check box and click Export.
In the Certificates drop-down list, select the Organizational CA.
In the Export Format drop-down list, select DER.
Click OK.
Download the certificate and copy the downloaded certificate to the /data directory.
Import the certificates into the PKCS keystore in step 2:
keytool -import -trustcacerts -alias root -keystore /data/tomcat-ua.ks -file /data/cert.der -storepass <password> -noprompt
keytool -import -alias ua -keystore /data/tomcat-ua.ks -file /data/ua.der -storepass <password> -noprompt
NOTE:Ensure that the certificates are available in the path that was specified as an input for deployment.
Perform the following steps to generate the certificates:
Ensure that the Java version installed is Azul Zulu 1.8.0_392 or later.
Ensure that you set the Java path. For example, run the following command:
export PATH=<java installed location>/bin:$PATH
For example,
export PATH=/opt/netiq/common/jre/bin/:$PATH
Generate the PKCS keystore:
keytool -genkey -alias rpt -keyalg RSA -storetype pkcs12 -keystore /config/tomcat-rpt.ks -validity 3650 -keysize 2048 -dname "CN=identityreporting.example.com" -keypass <password> -storepass <password>
Generate a certificate signing request:
keytool -certreq -v -alias rpt -file /data/rpt.csr -keypass <password> -keystore /data/tomcat-rpt.ks -storepass <password>
Generate a self-signed certificate:
Launch Identity console and login.
Navigate to Certificate Management > Issue Certificate.
Browse to the .csr file created in step 4. For example, rpt.csr.
Click Open.
Under Key Usage Specifications drop-down, Specify the key type.
Under Extended Key Usage Specifications drop-down, Specify the Extended key type.
For the certificate type, select Unspecified under Basic Constrains drop down.
Specify the validity of the certificate under Certificate Parameters drop down.
Select the File in binary DER format under Certificate format drop down.
Click Next.
Click OK.
Download the certificate and copy the downloaded certificate to the /data directory.
Export the root certificate in .der format:
Launch Identity console and login.
Navigate to Certificate Management > Server Certificate Management.
Select the SSL CertificateDNS check box and click Export.
In the Certificates drop-down list, select the Organizational CA.
In the Export Format drop-down list, select DER.
Click OK.
Download the certificate and copy the downloaded certificate to the /data directory.
Import the certificates into the PKCS keystore you created in step 2:
keytool -import -trustcacerts -alias root -keystore /data/tomcat-rpt.ks -file /data/cert.der -storepass <password> -noprompt
keytool -import -alias rpt -keystore /data/tomcat-rpt.ks -file /data/rpt.der -storepass <password> -noprompt
NOTE:Ensure that the certificates are available in the path that was specified as an input for deployment.
NOTE:Before you deploy the OSP container, ensure that you generate the required certificates. For more information, see Generating Certificates for OSP.
Generate the silent properties file. For more information, see Creating the Silent Properties File.
From the location where you have extracted the Identity_Manager_4.9.0_Containers.tar.gz file, navigate to the Identity_Manager_4.9.0_Containers/docker-images directory.
Run the following command to load the image:
docker load --input IDM_490_osp.tar.gz
Deploy the container using the following command:
docker run --restart unless-stopped -d --ip=192.168.0.5 --network=idmoverlaynetwork --hostname=osp.example.com -p 8543:8543 --name=osp-container -v /etc/hosts:/etc/hosts -v /data:/config -e SILENT_INSTALL_FILE=/config/silent.properties --stop-timeout 100 osp:idm-4.9.0-580
To verify whether the container was successfully deployed, check the log files by running the following command:
tail -f /data/osp/log/idmconfigure.log
To log in to the container, run the following command:
docker exec -it <container> <command>
For example,
docker exec -it osp-container bash
From the location where you have extracted the Identity_Manager_4.9.0_Containers.tar.gz file, navigate to the Identity_Manager_4.9.0_Containers/docker-images directory.
Run the following command to load the image:
docker load --input IDM_490_postgres.tar.gz
Create a sub-directory under the shared volume /data, for example, postgres.
mkdir postgres
Deploy the container using the following sample command:
docker run --restart unless-stopped -d --ip=192.168.0.6 --network=idmoverlaynetwork --hostname=postgresql.example.com --name=postgresql-container -p 5432:5432 -e POSTGRES_PASSWORD=<password> -v /data/postgres:/var/lib/postgresql/data -v /etc/hosts:/etc/hosts -v /data:/config --stop-timeout 100 postgres:12.18
For example,
docker run --restart unless-stopped -d --ip=192.168.0.6 --network=idmoverlaynetwork --hostname=postgresql.example.com --name=postgresql-container -p 5432:5432 -e POSTGRES_PASSWORD=novell -v /data/postgres:/var/lib/postgresql/data -v /etc/hosts:/etc/hosts -v /data:/config --stop-timeout 100 postgres:12.18
Create the idmdamin user for Identity Applications.
docker exec -it postgresql-container psql -U postgres -c "CREATE USER idmadmin WITH ENCRYPTED PASSWORD '<password>'"
Create the Identity Applications, Workflow, and Identity Reporting databases.
docker exec -it postgresql-container psql -U postgres -c "CREATE DATABASE idmuserappdb"
docker exec -it postgresql-container psql -U postgres -c "CREATE DATABASE igaworkflowdb"
docker exec -it postgresql-container psql -U postgres -c "CREATE DATABASE idmrptdb"
NOTE:These databases are used while you configure the Identity Applications and Identity Reporting containers.
Grant all the privileges on the databases for the idmadmin user:
docker exec -it postgresql-container psql -U postgres -c "GRANT ALL PRIVILEGES ON DATABASE idmuserappdb TO idmadmin"
docker exec -it postgresql-container psql -U postgres -c "GRANT ALL PRIVILEGES ON DATABASE igaworkflowdb TO idmadmin"
To log in to the container, run the following command:
docker exec -it <container> <command>
For example,
docker exec -it postgresql-container bash
NOTE:Before you deploy the Identity Applications container, ensure that you generate the required certificates. For more information, see Generating Certificates for Identity Applications.
Generate the silent properties file. For more information, see Creating the Silent Properties File.
NOTE:Specify the exposed port, 18543, as the value for the application server port.
From the location where you have extracted the Identity_Manager_4.9.0_Containers.tar.gz file, navigate to the Identity_Manager_4.9.0_Containers/docker-images directory.
Run the following command to load the image:
docker load --input IDM_490_identityapplication.tar.gz
Deploy the container using the following command:
docker run --restart unless-stopped -d --ip=192.168.0.7 --network=idmoverlaynetwork --hostname=identityapps.example.com -p 18543:18543 --name=idapps-container -v /etc/hosts:/etc/hosts -v /data:/config -e SILENT_INSTALL_FILE=/config/silent.properties --stop-timeout 100 identityapplication:idm-4.9.0-580
To verify whether the container was successfully deployed, check the log files by running the following command:
tail -f /data/userapp/log/idmconfigure.log
To log in to the container, run the following command:
docker exec -it <container> <command>
For example,
docker exec -it idapps-container bash
Run the following command:
NOTE:Before performing this step, ensure that the container is deployed successfully.
/opt/netiq/common/jre/bin/keytool -importkeystore -srckeystore /config/tomcat-osp.ks -srcstorepass <password> -destkeystore /opt/netiq/idm/apps/tomcat/conf/idm.jks -deststorepass <password>
Type yes to overwrite the entry for the root alias.
Restart the Identity Applications container.
docker restart idapps-container
NOTE:To modify any settings in the configuration update utility, launch configupdate.sh from the /opt/netiq/idm/apps/configupdate/ directory of the Identity Applications container. The configuration update utility can be launched in console mode only.
Generate the silent properties file. For more information, see Creating the Silent Properties File.
From the location where you have extracted the Identity_Manager_4.9.0_Containers.tar.gz file, navigate to the Identity_Manager_4.9.0_Containers/docker-images directory.
Run the following command to load the image:
docker load --input IDM_490_formrenderer.tar.gz
Deploy the container using the following command:
docker run --restart unless-stopped -d --ip=192.168.0.8 --network=idmoverlaynetwork --hostname=formrenderer.example.com -p 8600:8600 --name=fr-container -v /etc/hosts:/etc/hosts -v /data:/config -e SILENT_INSTALL_FILE=/config/silent.properties --stop-timeout 100 formrenderer:idm-4.9.0-580
To log in to the container, run the following command:
docker exec -it <container> <command>
For example,
docker exec -it fr-container bash
Generate the silent properties file. For more information, see Creating the Silent Properties File.
From the location where you have extracted the Identity_Manager_4.9.0_Containers.tar.gz file, navigate to the Identity_Manager_4.9.0_Containers/docker-images directory.
Run the following command to load the image:
docker load --input IDM_490_activemq.tar.gz
Deploy the container using the following command:
docker run --restart unless-stopped -d --ip=192.168.0.9 --network=idmoverlaynetwork --hostname=activemq.example.com -p 61616:61616 --name=amq-container -v /etc/hosts:/etc/hosts -v /data:/config --env-file /data/silent.properties --stop-timeout 100 activemq:idm-4.9.0-580
To log in to the container, run the following command:
docker exec -it <container> <command>
For example,
docker exec -it amq-container bash
Configure ActiveMQ. For more information, see Setting Up ActiveMQ Startup Service in the NetIQ Identity Manager Driver for JDBC Fanout Implementation Guide.
NOTE:Before you deploy the Identity Reporting container, ensure that you generate the required certificates. For more information, see Generating Certificates for Identity Reporting.
Generate the silent properties file. For more information, see Creating the Silent Properties File.
NOTE:Specify the exposed port, 28543, as the value for the application server port.
From the location where you have extracted the Identity_Manager_4.9.0_Containers.tar.gz file, navigate to the Identity_Manager_4.9_Containers/docker-images directory.
Run the following command to load the image:
docker load --input IDM_490_identityreporting.tar.gz
Deploy the container using the following command:
docker run --restart unless-stopped -d --ip=192.168.0.10 --network=idmoverlaynetwork --hostname=identityreporting.example.com -p 28543:28543 --name=rpt-container -v /etc/hosts:/etc/hosts -v /data:/config -e SILENT_INSTALL_FILE=/config/silent.properties --stop-timeout 100 identityreporting:idm-4.9.0-580
To verify whether the container was successfully deployed, check the log files by running the following command:
tail -f /data/reporting/log/idmconfigure.log
To log in to the container, run the following command:
docker exec -it <container> <command>
For example,
docker exec -it rpt-container bash
Run the following command:
NOTE:Before performing this step, ensure that the container is deployed successfully.
/opt/netiq/common/jre/bin/keytool -importkeystore -srckeystore /config/tomcat-osp.ks -srcstorepass <password> -destkeystore /opt/netiq/idm/apps/tomcat/conf/idm.jks -deststorepass <password>
Type yes to overwrite the entry for the root alias.
Restart the Identity Reporting container.
docker restart rpt-container
Perform the following tasks to deploy the SSPR container:
Generate the silent properties file for SSPR. Select Identity Applications while generating the silent properties file. For more information, see Creating the Silent Properties File.
Create a sub-directory under the shared volume /data, for example, sspr.
mkdir sspr
From the location where you have extracted the Identity_Manager_4.9.0_Containers.tar.gz file, navigate to the Identity_Manager_4.9.0_Containers/docker-images directory.
Run the following command to load the image:
docker load --input IDM_490_sspr.tar.gz
Deploy the container using the following sample command:
docker run --restart unless-stopped -d --ip=192.168.0.11 --network=idmoverlaynetwork --hostname=sspr.example.com --name=sspr-container -v /etc/hosts:/etc/hosts -v /data/sspr:/config -p 8443:8443 --stop-timeout 100 sspr/sspr-webapp:4.7.0.1-580
Run the following command from the Docker host to copy the silent.properties file from the Docker host to SSPR container:
docker cp /data/silent.properties sspr-container:/tmp
Load the silent properties file to the SSPR container.
docker exec -it sspr-container /app/command.sh ImportPropertyConfig /tmp/silent.properties
NOTE:Check if the SSPRConfiguration.xml is created under the /config directory of SSPR container and verify the content of the file.
Import the OAuth certificate to SSPR:
From the Docker host, edit the SSPRConfiguration.xml file located at /data/sspr directory and set the value of the configIsEditable flag to true and save the changes.
Launch a browser and enter the https://sspr.example.com:8443/sspr URL.
Log in using administrator credentials, for example, uaadmin.
Click on the user, for example, uaadmin, on the top-right corner and then click Configuration Editor.
Specify the configuration password and click Sign In.
Click Settings > Single Sign On (SSO) Client > OAuth and ensure that all URLs use the HTTPS protocol and correct ports.
Under OAuth Server Certificate, click Import from Server to import a new certificate and then click OK.
Click
at the top-right corner to save the certificate.
Review the changes and click OK.
After the SSPR application is restarted, edit the SSPRConfiguration.xml file and set the value of the configIsEditable flag to false and save the changes.
For more information on deploying Identity Console Container, see Installing OpenText Identity Console as Docker Container .