IMPORTANT:The Cloud Bridge external repository is applicable only for Advanced Authentication as a Service (SaaS).
In Advanced Authentication as a Service environments, Cloud Bridge act as an identity transfer bridge between Advanced Authentication in the cloud and data sources in on-premises environments. The Cloud Bridge retrieves the identify information from the on-premises repositories and makes this data available periodically or on-demand requests to Advanced Authentication.
The Cloud Bridge Agent is the entity that responds to the Advanced Authentication collection and fulfillment commands and directs them to the proper data source for execution. To collect data from multiple on-premises repositories, you need to install a Cloud Bridge Agent in each on-premises repositories.
To learn the benefits of Cloud Bridge, see Understanding the Benefits of Cloud Bridge.
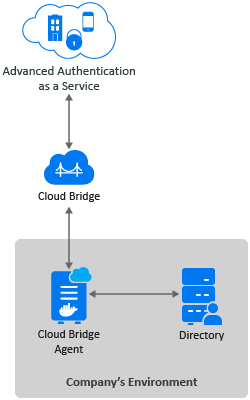
To add a Cloud Bridge external repository, perform the following steps:
Before adding a new Cloud Bridge repository, ensure that you have the privilege to use the Cloud Bridge. Once you have the privilege to use Cloud Bridge, the Cloud Bridge Client(s) list will be displayed in the Client as in Step 6b. If you do not have the privilege to use Cloud Bridge, wait for the Open Text operations team (Center of Excellence or CoE) to entitle you or contact CoE.
Click Repositories > New Cloud Bridge External repo.
Select an applicable repository type from the LDAP type list. The supported options are:
AD for Active Directory Domain Services.
eDirectory for eDirectory.
Specify the name of the repository in Name.
NOTE:For AD repositories, the name of the repository must correspond to the domain NetBIOS name.
Specify a container for the users in Base DN. When you select the Search full subtree option, Advanced Authentication performs a search for the users in all the child nodes. You can change the search scope by selecting the Search one level only option.
You can specify a container for the groups in Group DN (optional). When you select the Search full subtree option, Advanced Authentication performs a search for the groups in all the child nodes. You can change the search scope by selecting the Search one level only option.
Select the preferred High Availability Mode for distributing the load and to achieve uninterrupted synchronization of user identities from LDAP servers. The default option is Round Robin. Available options are:
Round Robin: This approach allows Advanced Authentication Server to distribute the incoming request with available LDAP servers. This provides load balancing and if an LDAP server is not available then it will be skipped.
Failover: In this approach, first available LDAP Server in the list gets all incoming request, in case the first LDAP Server is unavailable, then all requests are directed to the subsequent LDAP server in the list.
Add external server configurations:
Click Add Server.
Select the required client URL from Client.
Select the required data center from Data Center.
This list allows to add multiple domains.
Specify a local IP address of the LDAP server in LDAP server.
Specify the port number of the server in Port. For example, 389.
(Optional) Enable SSL to ensure that the LDAP connection to the appliance is secured with a valid self-signed SSL certificate. This helps to prevent any attacks on the LDAP connection and ensures safe authentication.
NOTE:If SSL is enabled, you need to upload the LDAP CA certificate.
Click the save
icon next to the server credentials.
If SSL is enabled for the external server, click Choose File in LDAP CA certificate, and select the certificate file from the local drive.
Open Agents and Clients if you need to view the following details:
Agent ID: It lists the available datacenter.json files. You can select the required Agent ID to view the corresponding datacenter.json information.
Client URL: Select the required Client URL to view the available Client URL.
Click Save.
To understand the prerequisites and install procedure of installing Cloud Bridge Agent, see Installing the Cloud Bridge Agent.
You can perform the following to manage the Cloud Bridge external repository:
Advanced Settings allow you to customize attributes that Advanced Authentication reads from a repository. Click + to expand the Advanced Settings. The following list describes the different attributes in Advanced Settings:
This option allows you to disable the automatic initialization of fast synchronization of repository that might impact regular functioning of other dependent components. By default, this option is set to ON indicating the fast synchronization happens at intervals that is set in Time between fast syncs.
This option allows you to set the required synchronization interval between the fast synchronization of repositories. By default, the interval is set to 5 minutes.
Advanced Authentication validates the specified attributes for an entered user name.
For Active Directory (AD), the default attributes are sAMAccountName and userPrincipalName. For other repositories, cn is the default attribute.
NOTE:Points to consider about the otherMailbox attribute:
Advanced Authentication 6.4 Service Pack 2 Patch 1 includes the otherMailbox attribute as default attribute in User lookup attributes.
When you upgrade to Advanced Authentication 6.4 Service Pack 3 then the otherMailbox attribute is supported as default attribute in the existing repository. However, for a new repository, the otherMailbox attribute is not supported as default to improve search and performance.
Advanced Authentication shows a name from the first, non-empty specified field for an entered user name.
For AD, the default attributes are sAMAccountName and userPrincipalName. For other repositories, cn is the default attribute.
NOTE:Points to consider about the otherMailbox attribute:
Advanced Authentication 6.4 Service Pack 2 Patch 1 includes the otherMailbox attribute as default attribute in User Name attributes.
When you upgrade to Advanced Authentication 6.4 Service Pack 3 then the otherMailbox attribute is supported as default attribute in the existing repository. However, for a new repository, the otherMailbox attribute is not supported as default to improve search and performance.
Advanced Authentication validates the specified attributes to retrieve a user's email address.
Default attributes are mail and otherMailbox.
Advanced Authentication validates the specified attributes to retrieve a user's phone number. These attributes are used for methods such as SMS OTP, Voice, and Voice OTP. Previously, the first attribute of User cell phone attributes was used as a default attribute for authenticating with SMS OTP, Voice, and Voice OTP methods. Now, users can use different phone numbers for these methods. For example, Bob wants to authenticate with SMS OTP, Voice, and Voice OTP methods. He has a cell phone number, a home phone number, and an IP phone number and wants to use these numbers for each of these methods. He can define these phone numbers in the respective settings of these methods.
Default attributes: mobile, otherMobile.
NOTE:If you have multiple repositories, you must use the same configuration of User cell phone attributes for all the repositories.
Advanced Authentication validates the specified attributes for an entered group name.
For Active Directory, the default attribute is sAMAccountName. For other repositories, cn is the default attribute.
Advanced Authentication shows a name from the first, non-empty specified field for an entered group name.
For Active Directory, the default attribute is sAMAccountName. For other repositories, cn is the default attribute.
Advanced Authentication supports the RFC 2037 and RFC 2037 bis. RFC 2037 determines a standard LDAP schema and contains a memberUid attribute (POSIX style). RFC 2037 bis determines an updated LDAP schema and contains a member attribute. Active Directory, LDS, and eDir support RFC 2037 bis. OpenLDAP contains posixAccount and posixGroup that follows RFC 2037.
Advanced Authentication supports the following attributes for the Group Name attributes:
|
Attribute |
Default Value |
Value for the Repository |
|---|---|---|
|
PKI card certificate id attribute |
altSecurityIdentities |
X509IssuerSerialNumber |
|
User Object Class |
user |
OpenDJ and OpenLDAP: person |
|
Group Object Class |
group |
OpenDJ: groupOfNames OpenLDAP: posixGroup |
|
Group Member Attribute |
member |
OpenDJ: member OpenLDAP: memberUid. If a required group contains groupOfNames class, disable POSIX style groups. If the group contains posixGroup, enable POSIX style groups.
|
NOTE:For information about the Logon filter settings (Legacy logon tag and MFA logon tag), see Configuring Logon Filter.
This attribute is applicable for the RADIUS Server event. This attribute displays additional information (for example, pager number) on the RADIUS client.
This list show attributes which should be returned to the REST API clients on successful authentication
The following table describes the batch attributes that the appliance uses:
|
Attribute |
Description |
|---|---|
|
CB page size limit |
The maximum number of users per groups to fetch from LDAP server. The value should not exceed 1000. |
|
CB chunk request timeout |
The number of seconds of idle time before a batched collection session is terminated. The default value is 600 seconds. |
|
CB ldap read timeout |
The number of minutes the LDAP client will wait for the server response before a connection is terminated (0=no timeout). The default value is 5 minutes. |
|
CB users_page size limit |
The maximum number of users to be processed in one batch. The value should not exceed 1000. |
|
CB groups page size limit |
The maximum number of groups to be processed in one batch. The value should not exceed 1000. |
|
User repository alias |
Alias name for the repository for ease of identification among numerous repositories. |
The following table describes the attributes that the appliance uses in the supported directories.
|
Attribute Name |
LDAP Name |
Description |
Type |
Supported in Active Directory |
Supported in eDirectory |
|---|---|---|---|---|---|
|
CN (Common Name) |
CN |
An identifier of an object |
String |
✓ |
✓ |
|
Mobile |
Mobile |
A phone number of an object's cellular or mobile phone |
Phone number |
✓ |
✓ |
|
Email Address |
|
An email address of a user |
Email address |
✓ |
✓ |
|
User-Principal-Name (UPN) |
userPrincipalName |
An Internet based format login name for a user |
String |
✓ |
✓ |
|
SAM-Account-Name |
sAMAccountName |
The login name used to support clients and servers running earlier versions of operating systems such as Windows NT 4.0 |
String |
✓ |
× |
|
GUID |
GUID |
An assured unique value for any object |
× |
✓ |
|
|
Object Class |
Object Class |
An unordered list of object classes |
String |
✓ |
✓ |
|
Member |
Member |
A list that indicates the objects associated with a group or list |
String |
✓ |
✓ |
|
User-Account-Control |
userAccountControl |
Flags that control the behavior of a user account |
✓ |
× |
|
|
ms-DS-User-Account-Control-Computed |
msDS-User-Account-Control-Computed |
Flags that are similar to userAccountControl, but the attribute's value can contain additional bits that are not persisted |
✓ |
× |
|
|
Primary-Group-ID |
primaryGroupID |
A relative identifier (RID) for the primary group of a user |
✓ |
× |
|
|
Object-Guid |
objectGUID |
A unique identifier for an object |
✓ |
× |
|
|
object-Sid |
objectSid |
A Binary value that specifies the security identifier (SID) of the user |
✓ |
× |
|
|
Logon-Hours |
logonHours |
Hours that the user is allowed to logon to the domain |
✓ |
× |
|
|
USN-Changed |
uSNChanged |
An update sequence number (USN) assigned by the local directory for the latest change including creation |
✓ |
× |
NOTE:The sAMAccountName and userPrincipalName attributes are supported only for AD DS repository. The Active Directory LDS and eDirectory repositories do not support these attributes.
Advanced Authentication server performs a background task to determine its connection with Repositories through the Cloud Bridge Agent. The connection status is indicated in the Current Configuration section of Edit Cloud Bridge External Repository page. You must define the following settings based on which the overall status is measured:
Success Threshold (times): Specify the number of consecutive connections that must succeed to recognize the connection as healthy. By default, success threshold is 1.
Failure Threshold (times): Specify the number of consecutive connections that must fail to recognize the connection as unhealthy. By default, failure threshold is 3.
For example, the below table details the configured threshold value and equivalent health status:
|
Option with value |
Health Status |
|---|---|
|
Success Threshold is set to 5 |
Five success messages indicates the connection is Healthy. |
|
Failure Threshold is set to 7 |
Seven error messages indicates the connection is Unhealthy. |
To synchronize the Cloud Bridge repository, perform the following steps:
Click Repositories and click Edit to edit the Cloud Bridge repository.
Click Full Synchronization to perform a full synchronization.
Check the synchronization status after some time.
NOTE:The YOURREPOSITORYNAME (fast): Users processed=0... Groups processes=0 message is acceptable.
NOTE:Fast synchronization occurs every five minutes. Full synchronization occurs once in seven days. However, every three hours a check is performed to confirm whether the full synchronization happened or not.
Advanced Authentication enables you to test Cloud Bridge configuration while creating, updating, or troubleshooting Cloud Bridge. When you test Cloud Bridge, you either ensure that the Cloud Bridge is properly configured, or you can change the Cloud Bridge configuration and quickly test again to check the results.
Perform the following steps to test Cloud Bridge:
Click Repositories and click Edit to edit the Cloud Bridge repository.
Click Test Configuration to test the configuration.
A message Your configuration looks OK is displayed.
Advanced Authentication enables you to change the settings in Repository and apply the changes by saving the settings. If you do not want to wait until the background task to apply the changes in Cloud Bridge configuration, you can break the Cloud Bridge operations and enforces the new configuration by using the Force Configuration button.
Perform the following steps to force configure Cloud Bridge:
Click Repositories and click Edit to edit the Cloud Bridge repository.
Change the configuration.
Click Force Configuration.
A message Your configuration has been forced is displayed.
To enable fast synchronization for the eDirectory repository that is configured as the Cloud Bridge external repository, ensure to install the change-log module on the eDirectory server. The change-log manages to log all the LDAP changes and enables fast sync for the eDirectory server.
The change-log module 4.0.8.1 is supported on eDirectory 9.2.
To install the change-log module, you must have full rights to the root of eDirectory container.
For synchronizing changes, ensure that you have the following rights to the base container of eDirectory:
Entry Rights: Read permission to collect attributes
Attributes Rights: Read permission on the attribute that are collected
ACL: Read
NOTE:If you have Identity Manager (IDM), Advanced Authentication, and a change-log module dedicated for IDM, you cannot point Advanced Authentication to the existing change-log module to achieve fast synchronization for the eDirectory repository. However, it is recommended to install a change-log module specifically for Advanced Authentication.
First, obtain the change-log module installer from here. The required files are available in the IDM_Changelog_4081.zip
Perform the following steps to extend the schema and install the change-log module:
Create a remote eDirectory schema file (clschema.sch) with the following content:
NDSSchemaExtensions DEFINITIONS ::=
BEGIN
"DirXML-ServerKeys" ATTRIBUTE ::=
{
Operation ADD,
Flags {DS_READ_ONLY_ATTR, DS_HIDDEN_ATTR},
SyntaxID SYN_OCTET_STRING,
ASN1ObjID {2 16 840 1 113719 1 14 4 1 65}
}
ENDExtend the connected remote eDirectory schema to introduce a new attribute DirXMLServerKeys. You must perform an eDirectory heath check to ensure that the tree is ready to accept the new schema.
To extend the clschema.sch schema file, use the ice utility.
For example:
ice -S SCH -f clschema.sch -D LDAP -s <remote eDirectory server> -d <Admin DN> -w <password>
Stop eDirectory.
Navigate to the directory containing the change-log RPM and perform one of the following actions:
To install the change-log RPM, run the following command:
rpm -ivh <rpm name>.rpm
Example: rpm -ivh ./novell-DXMLChlgx.rpm
To upgrade the change-log RPM, run the following command:
rpm -Uvh --noscripts ./novell-DXMLChlgx.rpm
Start eDirectory.